
This is not a complete tutorial on physics. Once you learn what I will teach you, it will be very easy to go and experiment on your own.
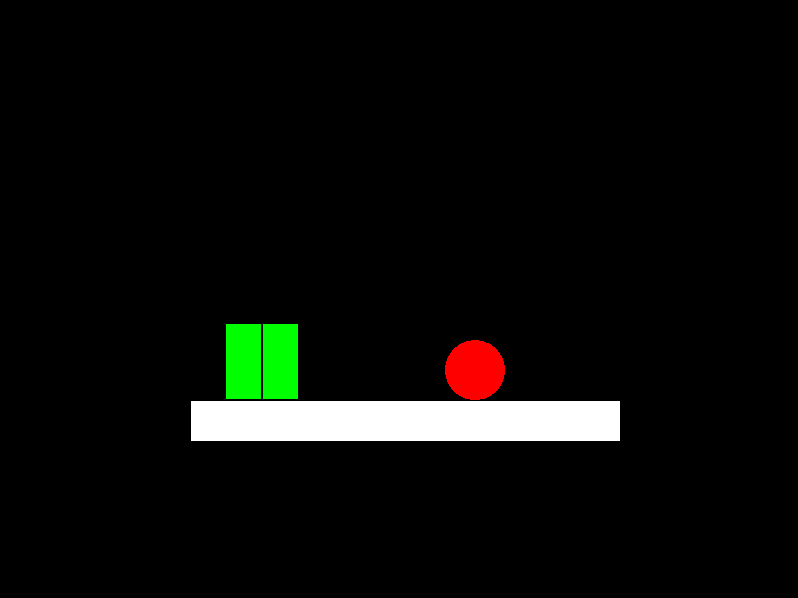
Here's what we're going to be making. By the end of this tutorial, all of this code will (probably) make sense to you.
 main.love
- (752 Bytes) Downloaded 397 times
Explanation
- Some insight on love.physics
- Why you would use it
Writing the code
- love.load
- love.update
- love.draw
Little reminder: I wouldn't consider love.physics to be a "ten ton hammer", as the wiki said, but it's much better to make a platformer without this module, as it will give you a much richer learning experience. If you've already made one, then be ready to learn love.physics!
Let's get started!
Explanation
First of all, you should know that love.physics is an implementation of Box2D, an open source C++ engine for simulating rigid bodies in 2 dimensions. LÖVE's version is basically translated to Lua, but if you need help with this, you are not limited to the LÖVE wiki, as there is a whole different community using Box2D, that is willing to help. This module has a lot of functions, and only a few will be used in this tutorial. All of the functions can be found on the love.physics wiki. They're all pretty much self explanatory.
The love.physics module is somewhat complicated when you look at it for the first time. There's a lot of steps to take, but the functions do almost all the work for you (that's why I don't like using this much, as it feels like I'm cheating!
Throughout this tutorial, I strongly recommend you comment what you write. My final "here's what the code should look like" will not contain any comments, but your code can contain as many comments as you want.
Finally, done explaining, now we can get to the fun part! Programming!
main.lua
First of all, you'll need to make your basic main.lua, with the default LÖVE skeleton (love.load, love.update, love.draw).
Code: Select all
p = love.physics --these are to facilitate the usage of love in the code.
g = love.graphics --so instead of typing love.graphics.blahblahblah every time,
k = love.keyboard --you can simply write g.blahblahblah! Yay!

function love.load()

end

function love.update(dt)

end

function love.draw()

end
love.load
Alright, now let's get working on love.load.
The FIRST thing you want to do, is to set how many pixels long one meter will be in this game. For this tutorial, let's set it to 100. This means that one meter in our game will equal 100 pixels on the screen. Simple!
Remember, this is going in love.load!
Code: Select all
p.setMeter(100) --as you can see, i simply had to write p.setMeter(100) instead of love.physics.setMeter(100)
love.physics.newWorld(xg, yg, bool)
xg is the horizontal gravity in this world.
yg is the vertical gravity in this world.
bool is whether or not objects can sleep in this world. Sleeping basically means that the object is not moving, and it's much more efficient to update, rather than having a body constantly awake even if it's not moving.
Code: Select all
  w = p.newWorld(0, 9.8*p.getMeter(), true)

--[[this world will have no gravity horizontally, but will have a gravity of 9.8 meters vertically. Objects can sleep in this world.]]
This is still going to happen in love.load, since we need to set all the values for our objects.
First of all, we need to have an idea of what objects we're going to make. Let's have one ball, which we will control with the arrow keys, and a couple blocks that are besides each other. Oh, and this will all be on top of a rectangle that will be acting as the ground.
So, let's create the ground. This is very simple. An object needs 3 things: a body, a shape, and a fixture.
body: this is what gets affected by velocity, and it holds the X and Y. It's invisible.
shape: this is the shape that you see. It's used for mass control, and collision.
fixture: this is what attaches the shape to the body. It's like in those cartoons when someone's invisible, and they throw paint on him so you can see him!
Alright, so now you know this. To finally create the ground, I used a handy program that I made called Physmapper. It facilitates the creation (and drawing, but we'll get to that later) of objects. It is not needed for this tutorial, though.
So let's create our body for the ground. Remember, this is all going in love.load!
Code: Select all
ground = {} --this creates a ground table, which will hold the ground object and all its data.
ground.b = p.newBody(w, 407, 421, "static") --b for body!
--I'm creating a new body, in the world "w", at the x 407 and y 421, with the type "static". Static means that it will not move.
Code: Select all
ground.s = p.newRectangleShape(429, 40) --s for shape!
--I'm creating a new rectangle shape, that will be 429 pixels wide and 40 pixels tall. We don't need any coordinates, since this shape will be attached to the body!
Code: Select all
ground.f = p.newFixture(ground.b, ground.s) --f for fixture!
--I'm creating a new fixture, by attaching the shape ground.s to the body ground.b!
Now let's create 2 rectangles that are standing besides each other!
Again, I used Physmapper for this, but it is not needed.
Let's make a table that holds all the moving blocks!
Code: Select all
blocks = {
  {},
  {}
}
--we're making a blocks table that can hold 2 different blocks!
Code: Select all
blocks[1].b = p.newBody(w, 264, 254, "dynamic")
--creating a block in world w, at x 264 and y 254. Dynamic means that it moves.

blocks[1].s = p.newRectangleShape(35, 75)
 --creating a rectangle shape with the width of 35, and the height of 75

blocks[1].f = p.newFixture(blocks[1].b, blocks[1].s)
--creating a new fixture that will stick the body block[1].b and the shape block[1].s together.
Code: Select all
blocks[2].b = p.newBody(w, 264, 254, "dynamic")
--creating a block in world w, at x 264 and y 254. Dynamic, meaning that it moves.

blocks[2].s = p.newRectangleShape(35, 75)
 --creating a rectangle shape with the width of 35, and the height of 75, just like the first block.

blocks[2].f = p.newFixture(blocks[2].b, blocks[2].s)
--creating a new fixture that will stick the body block[1].b and the shape block[1].s together.
First, let's create a table that will hold our player object. Then we can create our player's body, shape, and fixture.
Code: Select all
player = {}

player.b = p.newBody(w, 476, 270, "dynamic")
--creating a new body in the world "w" at x 476 and y 270. dynamic because it will be moving.

player.s = p.newCircleShape(30)
--creating a new circle shape, with the radius of 30!

player.f = p.newFixture(player.b, player.s)
--like any other fixture, we're attaching the player.b and player.s together!

player.f:setRestitution(0.7)
--we're setting the player's restitution. This is how bouncy the player is.
Code: Select all
p = love.physics
g = love.graphics
k = love.keyboard

function love.load()
  p.setMeter(100)
  w = p.newWorld(0, 9.8*p.getMeter(), true)

  ground = {}

  ground.b = p.newBody(w, 407, 421, "static")
  ground.s = p.newRectangleShape(429, 40)
  ground.f = p.newFixture(ground.b, ground.s)

  blocks = {
    {},
    {}
  }

  blocks[1].b = p.newBody(w, 264, 254, "dynamic")

  blocks[1].s = p.newRectangleShape(35, 75)

  blocks[1].f = p.newFixture(blocks[1].b, blocks[1].s)


  blocks[2].b = p.newBody(w, 264, 254, "dynamic")

  blocks[2].s = p.newRectangleShape(35, 75)

  blocks[2].f = p.newFixture(blocks[2].b, blocks[2].s)

  player = {}

  player.b = p.newBody(w, 476, 270, "dynamic")

  player.s = p.newCircleShape(30)

  player.f = p.newFixture(player.b, player.s)

  player.f:setRestitution(0.7)
end

function love.update(dt)

end

function love.draw()

end
love.update
Basically what we're going to do here is put our world in motion. We're going to make the player move if we press arrow keys/WASD, and we're going to make the whole world update with a simple function called w:update(dt).
Remember, this here is going in love.update.
Code: Select all
w:update(dt) --update the world. If you don't have this, your world will not move.

if k.isDown("up") or k.isDown("w") then --let's start with up. This will be a flying player! :)
  player.b:applyForce(0, -600)
  --we're applying a force of 0 on the X axis, and -600 on the Y axis! -600 will make it go upwards, since love2d counts Y from up to down.
  --note: we're using -600 instead of -300 because gravity is also pulling down, so we need a stronger force to even it out!
end

if k.isDown("down") or k.isDown("s") then --let's move on to down! This will make the player go faster towards the ground.
  player.b:applyForce(0, 300)
  --again, applying force to the player's body. 0 on the X axis, and 300 on the Y axis. This will make it go downwards!
end

if k.isDown("left") or k.isDown("a") then --let's make him go left now.
  player.b:applyForce(-300, 0)
  --making the player go to the left by applying -300 force to the X axis, and 0 to the Y axis.
end

if k.isDown("right") or k.isDown("d") then --now, finally, to the right!
  player.b:applyForce(300, 0)
  --I think you get it... :)
end
Here's what the code should look like so far:
Code: Select all
p = love.physics
g = love.graphics
k = love.keyboard

function love.load()
  p.setMeter(100)
  w = p.newWorld(0, 9.8*p.getMeter(), true)

  ground = {}

  ground.b = p.newBody(w, 407, 421, "static")
  ground.s = p.newRectangleShape(429, 40)
  ground.f = p.newFixture(ground.b, ground.s)

  blocks = {
    {},
    {}
  }

  blocks[1].b = p.newBody(w, 264, 254, "dynamic")

  blocks[1].s = p.newRectangleShape(35, 75)

  blocks[1].f = p.newFixture(blocks[1].b, blocks[1].s)


  blocks[2].b = p.newBody(w, 264, 254, "dynamic")

  blocks[2].s = p.newRectangleShape(35, 75)

  blocks[2].f = p.newFixture(blocks[2].b, blocks[2].s)

  player = {}

  player.b = p.newBody(w, 476, 270, "dynamic")

  player.s = p.newCircleShape(30)

  player.f = p.newFixture(player.b, player.s)

  player.f:setRestitution(0.7)
end

function love.update(dt)
  w:update(dt)

  if k.isDown("up") or k.isDown("w") then
    player.b:applyForce(0, -300)
  end

  if k.isDown("down") or k.isDown("s") then
    player.b:applyForce(0, 300)
  end

  if k.isDown("left") or k.isDown("a") then
    player.b:applyForce(-300, 0)
  end

  if k.isDown("right") or k.isDown("d") then
    player.b:applyForce(300, 0)
  end
end

function love.draw()

end
love.draw
Now, we just need to draw our stuff.
First, let's start by drawing our player. Remember, this is going in love.draw!
Code: Select all
g.setColor(255, 0, 0) --let's set the color of the player to red.
g.circle("fill", player.b:getX(), player.b:getY(), player.s:getRadius())

--[[simply using the love.graphics.circle() method to draw our player.
we're setting the draw mode to fill, which means it will fill the shape with color.
for the second and third parameter, we're simply getting the player body's X and Y.
the third parameter is getting the radius of our player shape!
]]
Code: Select all
--creating the ground:
g.setColor(255, 255, 255) --setting the color to white for the ground. Because why not?
g.polygon("fill", ground.b:getWorldPoints(ground.s:getPoints()))

--[[here, I created a polygon with the draw mode fill.
The world points are which points we'll be drawing our rectangle around. It's a bit complicated.
]]

g.setColor(0, 255, 0) --setting the color for our blocks to green.
g.polygon("fill", blocks[1].b:getWorldPoints(blocks[1].s:getPoints()))
g.polygon("fill", blocks[2].b:getWorldPoints(blocks[2].s:getPoints()))
--[[what we're doing here is the same as the ground,
creating a polygon with drawmode fill and the world points... well, they're world points.
]]

g.setColor(255, 255, 255) --we should always set back the color to white at the end of love.draw!
Code: Select all
p = love.physics
g = love.graphics
k = love.keyboard

function love.load()
  p.setMeter(100)
  w = p.newWorld(0, 9.8*p.getMeter(), true)

  ground = {}

  ground.b = p.newBody(w, 407, 421, "static")
  ground.s = p.newRectangleShape(429, 40)
  ground.f = p.newFixture(ground.b, ground.s)

  blocks = {
    {},
    {}
  }

  blocks[1].b = p.newBody(w, 264, 254, "dynamic")

  blocks[1].s = p.newRectangleShape(35, 75)

  blocks[1].f = p.newFixture(blocks[1].b, blocks[1].s)


  blocks[2].b = p.newBody(w, 264, 254, "dynamic")

  blocks[2].s = p.newRectangleShape(35, 75)

  blocks[2].f = p.newFixture(blocks[2].b, blocks[2].s)

  player = {}

  player.b = p.newBody(w, 476, 270, "dynamic")

  player.s = p.newCircleShape(30)

  player.f = p.newFixture(player.b, player.s)

  player.f:setRestitution(0.7)
end

function love.update(dt)
  w:update(dt)

  if k.isDown("up") or k.isDown("w") then
    player.b:applyForce(0, -300)
  end

  if k.isDown("down") or k.isDown("s") then
    player.b:applyForce(0, 300)
  end

  if k.isDown("left") or k.isDown("a") then
    player.b:applyForce(-300, 0)
  end

  if k.isDown("right") or k.isDown("d") then
    player.b:applyForce(300, 0)
  end
end

function love.draw()
  g.setColor(255, 0, 0)
  g.circle("fill", player.b:getX(), player.b:getY(), player.s:getRadius())

  g.setColor(255, 255, 255) --setting the color to white for the ground. Because why not?
  g.polygon("fill", ground.b:getWorldPoints(ground.s:getPoints()))

  g.setColor(0, 255, 0) --setting the color for our blocks to green.
  g.polygon("fill", blocks[1].b:getWorldPoints(blocks[1].s:getPoints()))
  g.polygon("fill", blocks[2].b:getWorldPoints(blocks[2].s:getPoints()))

  g.setColor(255, 255, 255)
end
I thought I'd make this tutorial, because the tutorial on the wiki felt so... incomplete. It wasn't very explaining. I decided to make my own, that explains as much as it can.
